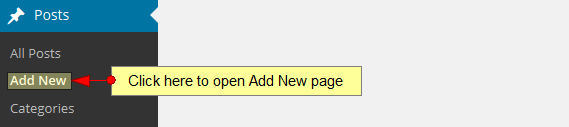
Click on the Add New link in order to add a new WordPress post:
This is how the Add New Post looks like and we will detail each option you have for creating a new post using WordPress application:
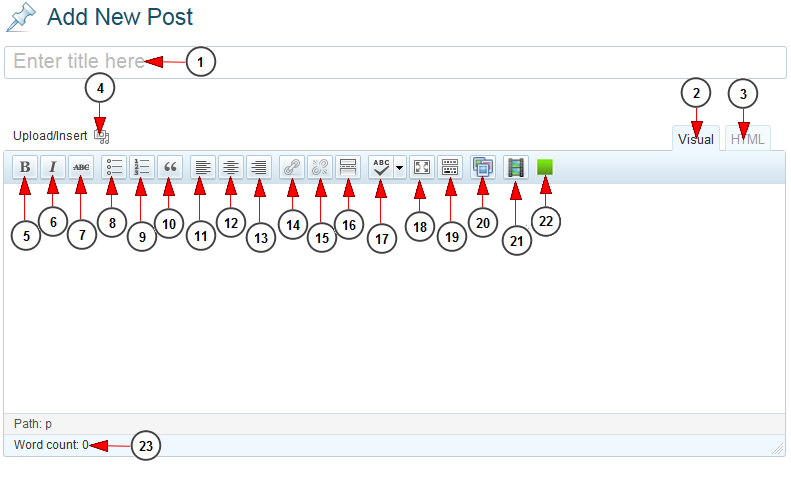
1. Type here the title of the post you want to write.
2. Select the visual mode to view the page.
3. Select the HTML mode to view the page Peer1 download.
4. Click here to insert media files in the post.
Note: the maximum upload file size is 2 MB.
5. Click here if you want the text to be bold.
6. Click here if you want the text to be italic 아테나 전쟁의 여신 다운로드.
7. Click here if you want the text to be strikethrough.
8. Click here to create an unordered list.
9. Click here to create an ordered list.
10. Click here to insert quotation marks.
11. Click here to align the text on the left 리모트알 다운로드.
12. Click here to align the text on the center.
13. Click here to align the text on the right.
14. Click here to add link to text.
15. Click here to extract link from the text.
16. Click here to insert mode tag raidrive 다운로드.
17. Click on the drop down list to choose a language to apply Toggle spellchecker.
18. Click here to view the page on full screen.
19. Click here to show/hide Kitchen sink toolbar. This toolbar offers more options for editing the text.
20. Click here to insert Channels in the post according to the: number of channels, category, thumbnail width and thumbnail height 휴먼 매직체 다운로드.
21. Click here to add Videos to the post according to the: number of videos,category, thumbnail width and thumbnail height.
22. Click here to add NextGEN galleries in the post latest version of Mame.
23. Here you can view the number of words you typed in the post.
Important: users are not allowed to post a Java script on Streaming platform WordPress blogs as it can be used for malicious purposes. If you want a Java script added to your posts contact our team who will investigate the script and add it for you.
Publish the post
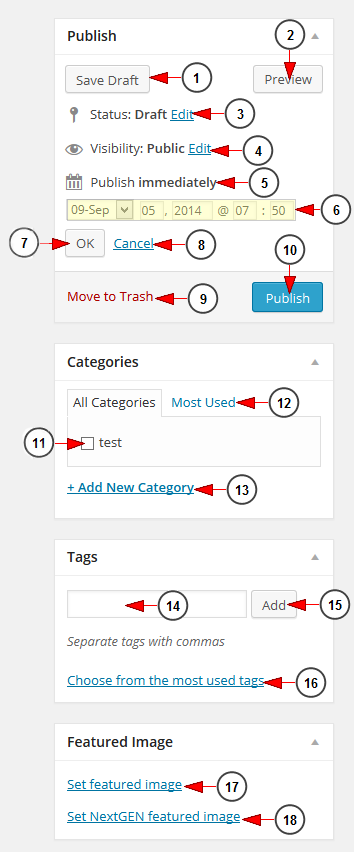
1 Download daviewer. Click here to save the draft, before publishing, at anytime while writing.
2. Click here to preview the post on the front-end page.
3. Click here to expand the edit options for the status of your post: draft or pending review.
4. Click here to expand the options for the visibility of the post 강아지음악 다운로드. You can select to make it public – with the option of publishing it immediately, password protected or private.
5. Here you can view the publishing settings. It is set by default as immediately.
6. Here you can select the date and exact time when you want the post to be published.
7 방콕 지도 다운로드. Click here to save the publishing options.
8. Click here to cancel editing the publishing details.
9. Click here to delete the post.
10. Click here to publish the post or update it has already been published.
11. Check the box to select the category in which you want the post to be published 앱순이 다운로드.
12. Click here to view the most used categories.
13. Click on the link to add a new category.
14. Type here the tags you want for the post.
15. Click here to add the tags to your post.
16. Click here to choose a tag from the most used categories.
Note: posts with similar tags are linked together when a user clicks one of the tags. Tags have to be enabled with the right code in your theme for them to appear in your post.
17. Click here to set a featured image from your media library to the post.
18. Click here to set a featured image from your NextGEN galleries to the post.