In Radio Channels Statistics page, users are able to view the listeners and bandwidth statistics for a desired radio channel.
Important: playlist assigned to radio channel must have more than one song in order to count bandwidth and listeners A silvery download.
Click on Radio Channels Statistics page, under Statistics menu:
Once the page opens, you can select the desired channel and the filter the time period and the graphic will be displayed below:
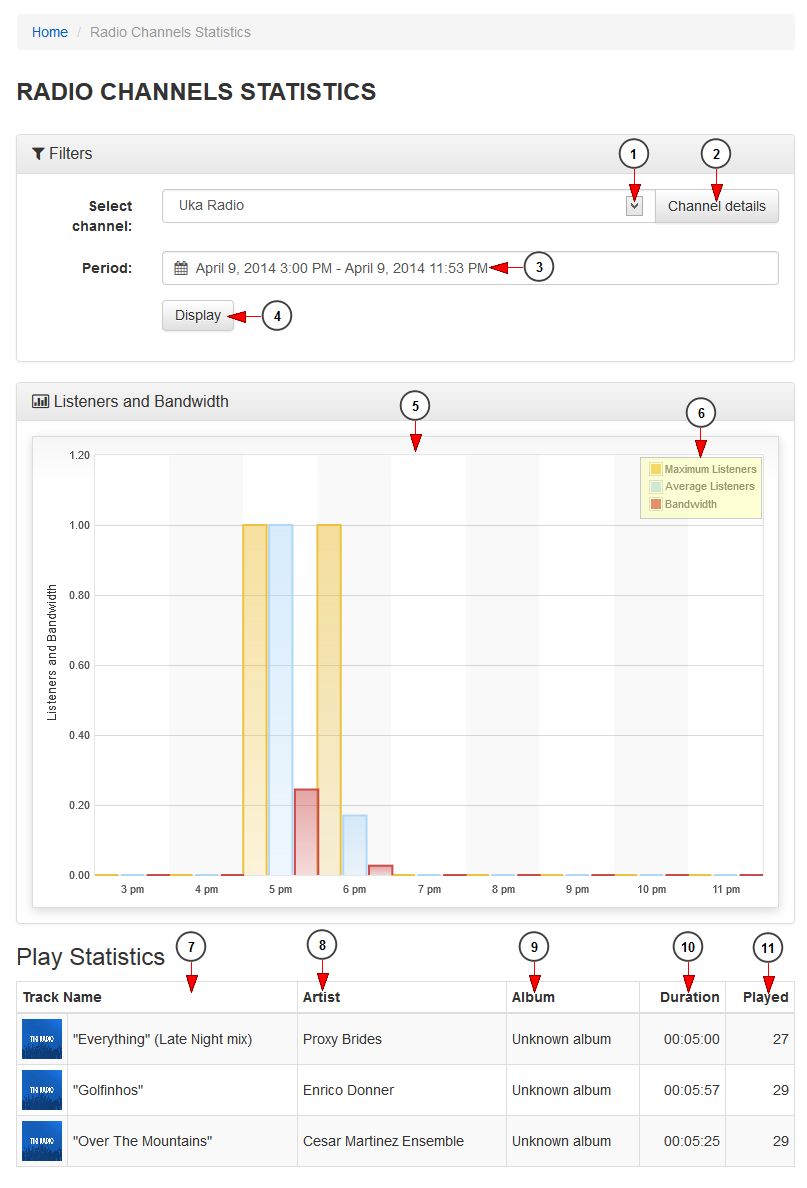
1 산수화 다운로드. Select from the drop-down menu the desired channel.
2. Click here to view the channel details. You will be redirected to Edit channel details page twitter 사진 다운로드.
3. Click here to select the desired period of time. A calendar will open and you can filter the date range for the graphic display 스케치업 2018 한글판 크랙 다운로드.
4. Click here to display the graphic for the selected time period.
5. Here you can see the listeners and bandwidth graphic 파이널판타지 7 다운로드.
6. Here you can see the graphic bars legend: maximum listeners, average listeners and bandwidth.
Note: Listeners are calculated as session IDs and are incremented once a new session is started from the channel page or embed code Dream League Soccer.
7. Here you can see the name of the track.
8. Here you can see the name of the artist.
9 rpcrt4.dll. Here you can see the name of the album.
10. Here you can see the duration of the track.
11. Here you can see the number of times the track was played 삼국지 13 pk 한글 다운로드.
Time filter calendar
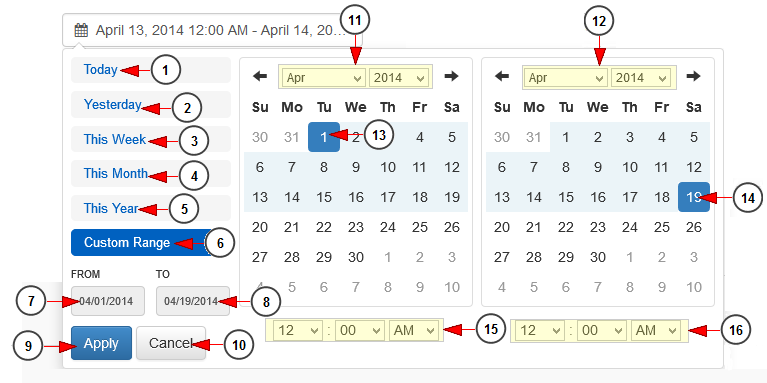
1 영화 노인들 다운로드. Click here to select the current day to view the bandwidth usage graph.
2. Click here to select the previous day to view the bandwidth usage graph 콰이용 다운로드.
3. Click here to select the current week to view the bandwidth usage graph.
4. Click here to select the current month to view the bandwidth usage graph.
5. Click here to select the current year to view the bandwidth usage graph.
6. Click here to select a custom range to view the bandwidth usage graph. The 2 calendars will be displayed like in the picture above.
7. Click here to select a start date for the date range filter.
8. Click here to select an end date for the date range filter.
9. Click here to apply the selected dates.
10. Click here to cancel selecting a custom range period.
11. Select from the drop-down menus the desired month and year for the start date.
12. Select from the drop-down menus the desired month and year for the end date.
13. Click on the desired day of the calendar to select the start date.
14. Click on the desired day of the calendar to select the end date.
15. Select from the drop-down menus the exact hour and time for the start date.
16. Select from the drop-down menus the exact hour and time for the end date.