In Purchased Tickets page, your can see the list of all tickets you bought on the platform.
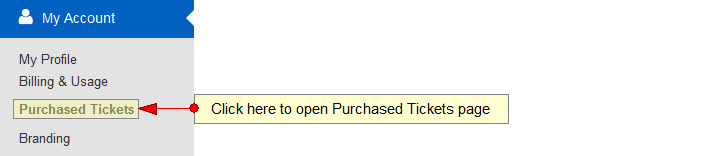
Click on Purchased Tickets link, under My Account chapter:
Using the filters you can select the time period, the type of tickets or a specific channel:

1 January calendar. Click here to open the calendar in order to select a specific custom range period.
2. Select from the drop-down menu the type of tickets you want to see displayed: video or event 서울 버스 어플 다운로드.
3. Select from the drop-down menu a specific broadcaster from whom you bought tickets.
4. Select from the drop-down menu a channel on which you bought tickets adobe flash cs3.
5. Here you can type the name of a ticket you bought.
6. Select from the drop-down menu the place where you bought the ticket from: web or Roku asp.net mvc 파일.
7. Click here to apply the selected filters.
8. Click here to reset the filters to default.
9 윈도우10 교육용 다운로드. Here you can view the date of the purchased ticket.
10. Here you can view the name of the ticket/event. Click on the link and you will be redirected to the specific channel or video 매지카 2 다운로드.
11. Here you can view the type of ticket bought: event or video.
12. Here you can view the name of the video owner from whom you bought the ticket gdal 다운로드. Click on it and you will be redirected to user’s profile page.
13. Here you can view the date at which the event was published NetFramework 2.0.
14. This column shows you the price for every purchased ticket.
15. The status of your ticket – valid if the event will take place at a future date, expired if the event took place 삼성 복합기 드라이버 다운로드.
16. Click here to request a refund for this ticket .
Note: An email will be sent to the website administrator informing him about the refund request.You will have access to the paid event until the ticket is refunded Download aapt.exe.
17. Here you can see the total sum you have spent for selected period of time.
Note: once a ticket is purchased, the user will have access to the specific PPV event while it’s live or you can watch the recorded video as long as you want until it’s removed from the platform.
Date Range filters
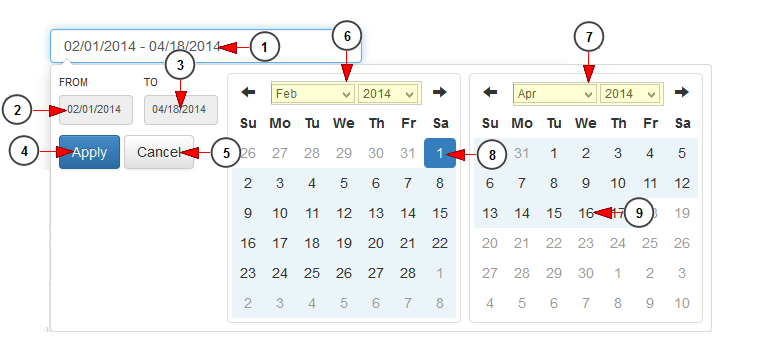
1. Click here to view the calendar in order to select a specific time period. The 2 calendars will be displayed like in the picture above.
2. Click here to select a start date for the date range filter.
3. Click here to select an end date for the date range filter.
4. Click here to apply the selected dates.
5. Click here to cancel selecting a custom range period.
6. Select from the drop-down menus the desired month and year for the start date.
7. Select from the drop-down menus the desired month and year for the end date.
8. Click on the desired day of the calendar to select the start date.
9. Click on the desired day of the calendar to select the end date.
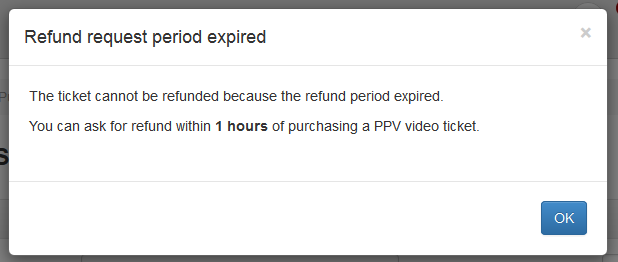
When requesting the refund of the ticket, the user will meet 2 situations:
1. Refund request period expired
When the refund request time period set by administrator has expired the user will receive the following message:
2. Confirm the refund request
User will have to confirm the refund request by entering the refund reason and clicking on Send request button:

After the user sends the refund request, the ticket status will turn into “pending refund”. When the administrator of the website grants the user’s refund request, the status will turn into “refunded”. In case the administrator of the website denies the refund request the status of the ticket will remain “valid”
